


How to select Business location & Customer #
Location: Select the Store location from the dropdown.
Customer: By default, there is “Walk-In Customer”. You can search for a customer by name/customer id or phone number or can add a new customer by clicking the plus (+) button “Add Customer”.
Commission agent & Selling Price #
Commission agent: Select the commission agent if applicable from the dropdown. (Read this to know How to add a commission agent)
Selling Price: Select the selling price group in which you want to sell the product. Select default if not applicable. (Read this to know more about the selling price group)
Searching or Adding Products #
Enter Product Name Or Scan the Barcode to search for the product.
If multiple products are matched then it displays the dropdown of products, selects the product. If there is a single product then it directly gets added to the cart/Screen.
Besides the Search Product tab, there is a weighing scale option. Simply scan the barcode and the product of the weighing scale.
Changing Product Price, Tax & Discount #

After the products get added, click on the product name to modify product price, tax & discounts.
You can also add a discount by clicking on the edit icon besides Rewards Point.
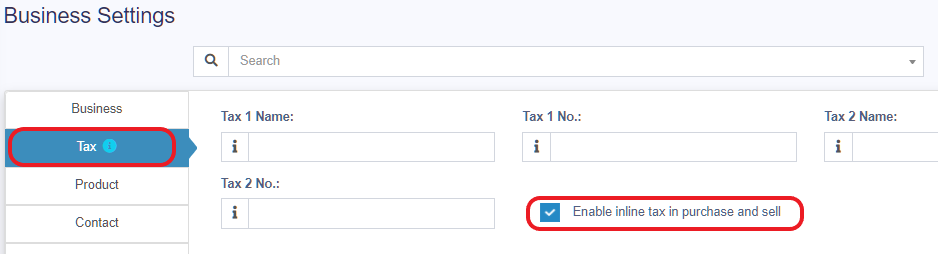
NOTE: Option for different tax in products will be shown only if Inline tax is enabled. You can enable it from Business Settings -> Tax -> Enable Inline Tax in the purchase and sell
Selecting the Lot number for a product #
If the lot number is enabled then it will show the option to select the lot number.
Selecting Expiry for a product #
Expiry Date: If the expiry date is enabled then it will show the option to select the lot number. (Enabling expiry)
How to cancel a Sale #
To cancel the sales click on the cancel button. Cancel invoices are not saved in the system, so no stock will be deducted.

Draft & Quotation #
This is useful if you want to create a quotation before sales.
Marking sales as Draft or Quotations will not deduct the available stock.
You can view all Quotations & Drafts from List Quotation or List Draft respectively. Existing draft/Quotation can be edited to make it as final sales.
Suspended Sales #
Suspend Sales means unfinished sales or holding Sales.
Suspended sales stock gets deducted from available stock. You can view all suspended sales by clicking on the Yellow Color button (pause button) present at the very top right of the screen.
Some Use Case of Suspended sales
- In a store, if you have a suspended button, you can suspend a particular customer’s sales and entertain another customer, when he comeback you can proceed with his sale.
- In Restaurant, you can suspend the order of customers if not yet paid, and finish it when they finish eating and paid their order, so you can proceed to final sales. You can put Table 1, Table 2, Table 3… so when they finish it’s easy to identify table 3 going to pay.
- In the hotel, lots of customers, who check in stay for 2 nights and order some food, and customers say, just charge to room 024. So you can suspend their orders and edit if there is some additional order and suspend again. Until final it when they pay their bills. on Hotel, on Reference Number: Room 009, Room 012.
Credit Sales #
To sell on credit to the customer you first need to enable this button by going to Settings -> Business Settings -> POS -> Show Credit Sale Button
Then on the POS screen, you will be able to see a button “Credit Sale”, simply click this button to make sales on credit.
Half Credit & half payment Sales: #
Suppose the invoice amount is $1000, the customer pays $700 cash and $300 is the credit amount on him, then follow these steps:
- Click on the multiple pay button
- Select the payment method and enter the amount paid by the customer. ($700 in our example)
- Click finalize payment.
- Now, the pending amount is automatically added as a credit amount on him (or amount to be taken from the customer)
Card / Multiple Pay / Cash #
Multiple Pay
Used when the customer wants to pay with different payment methods like some amount by card, some by cash, and some other payment methods.
Card
Used when the customer wants to pay the complete invoice by card.
Cash
Used when customers pay the exact amount of invoice by cash. If the customer pays less or more amount than the invoice amount then use Multiple Pay to get a change return.
Adding payments from Contact #
Go to contact -> Suppliers. Click on actions for the supplier and it will show “Pay Due amount”, click on it and pay the amount. “Pay Due amount” this option is not displayed if there is no payment due.
Rounding Mechanism for total Sales amount or total payable #

Rounding helps to round the total payable to the nearest currency exchange available.
To enable rounding go to Settings -> Business Settings -> Sales and choose the Amount rounding method
Amount rounding method
- Round to nearest whole number: It will round the payable value to the nearest whole number. For example, 1.49 will be rounded to 1.00, and 1.51will be rounded to 2.00
- Round to nearest decimal (multiple of 0.05): It will round the payable value to the nearest decimal number which is a multiple of 0.05. For example, 1.49 will be rounded to 1.50, 1.51 will be rounded to 1.50, 1.59 will be rounded to 1.60, 1.54 will be rounded to 1.55
Similarly, all other rounds to the nearest decimal number work as per the multiplier.